Easiest Way To Take A Screenshot On Your Mac
If you’re a new MacOS user, you might be wondering on how you can take a screenshot without having that “Print Screen” key. Worry no more, in this blog, Geeky Duck will teach you the easiest way to take a screenshot on your Mac.
Screenshot using keyboard commands
There is only one step in this one.
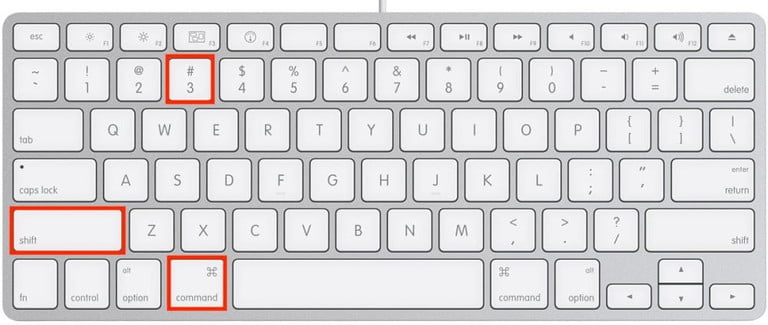
Step 1: Press Shift + Command + the number 3 key all at the same time
This simple trick will automatically save a copy of your screenshot on your desktop.
How To Take A Screengrab For A Selected Region
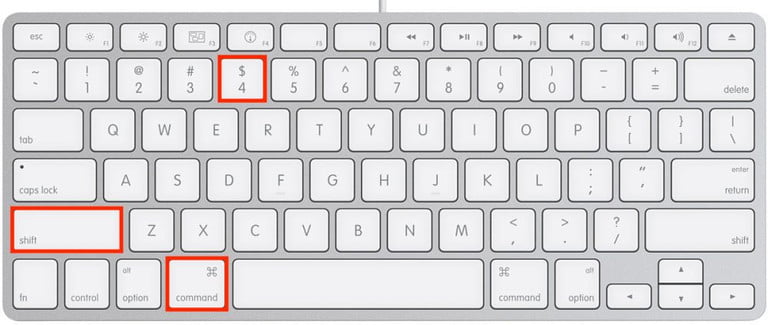
Step 1: Press the Shift + Command + the number 4 key all at the same time.
Step 2: After you press the keys that are mentioned above, your poiner will automatically change into a crosshair. Once you see the change, you want to click the crosshair and drag it to the region that you want to get.
Step 3: Let go of the crosshair so the screengrab can be automatically saved to your desktop.
How To Take A Screengrab With The Grab Option In MacOS Mojave
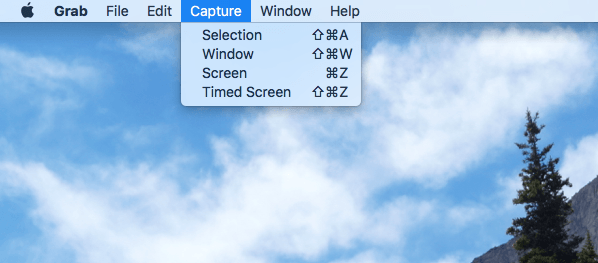
Step 1: Use the keyboard shortcuts cmd + shift + 3 for a standard screen shot or use the keyboard shortcuts cmd + shift + 4 to make a manual selection.
Step 2: Use cmd + shift + 5 to open the new screen shot interface that is available in the MacOS Mojave.
Step 3: Click options in the new interface so you can show your mouse cursor in screenshots.
Step 4: After taking a screenshot, you want to click the thumbnail in the bottom right corner of the screen so you can access the markup tools.
Taking And Saving MacOS Screenshots
You might be thinking what happens to your file when you screengrab it. Once you hit the screengrab keys, your operating system will automatically time stamp the screenshot with the date and time it was taken. After that, it will automatically save a PNG file on your desktop.
If you are running MacOS Mojave or Catalina, there are a number of new quick-editing tools and new organization ways you can use to make things better.
Screenshots that are saved on your desktop can be quickly grouped together by using Stacks, which you can use by right-clicking the desktop and choosing Stacks, this will help you declutter things.
When they appear as thumbnails in the corner of your screen after taking them, you can click the screengrab PNG’s so you can quickly edit them by using markup tools.