Each Android phone is unique, as is taking screengrabs with them. Despite the fact that Android 4 presented a simple option to screengrab with the convenient power and-volume-down-key combo, nailing it every time is a bit tricky. That is the reason some smartphone makers have presented new strategies. We’re here to help: Just find your Android smartphone on the list underneath to become familiar with the different approaches to snap, share, and save a screengrab.
Acer Phones
- Press the Power and volume-down button for a few seconds.
- Pull down the notification board to arrive at fast settings and touch the Screenshot symbol.
Asus Phones
- Press the volume down and the Power button for a few seconds.
- Pull down the notification board to arrive at speedy settings and tap the Screenshot symbol.
Google Phones
- Nexus: Press the volume down and the Power button for two or three seconds.
- Pixels: Press the volume down and the Power button for a few seconds.
HTC Phones
- HTC U12+: Hold down the power button until your phone vibrates, and afterward tap the virtual home button on the navigation bar while as yet squeezing the power button
- HTC U arrangement (up to U12+): Press the volume down and the Power button for several seconds.
- HTC 10: Press the Power and home and buttons OR hold down the force and volume-down buttons for two or three seconds.
- All other HTC smartphones: Press the volume down and the Power button for two or three seconds.
Huawei and Honor Phones
- Press the volume down and the Power button for a few seconds.
- Pull down the notification board and tap the Screenshot symbol.
Lenovo
- Press the volume down and the Power button for two or three seconds.
- Pull down the notification board and touch the Screen Shot symbol.
LG Phones
- LG G7: Press the volume down and the Power button for two or three seconds.
- All other LG telephones: Hold down the Power (situated on the rear of the smartphone) and volume-down button for two or three seconds.
- Pull down the notification board and touch the Capture+ symbol.
Motorola Phones
- Press the volume down and the Power button for two or three seconds.
OnePlus Phones
- Every single OnePlus smartphone: Press the volume down and the Power button for two or three moments.
- OnePlus 6, 5 and 5T: Swipe down with three fingers on to the home screen.
Samsung Phones
- Galaxy S8 and later: Press the volume down and the Power button for two or three seconds.
- Galaxy S7 and prior: Press the home and the Power button for two or three seconds.
Sony phones
- Press the volume down and the Power button for two or three seconds.
- Press the Power button until a screen shows up and touch Take a Screenshot.
ZTE phones
- Press the volume down and the Power button for two or three seconds.
Google Assistant
On supported smartphones, you can likewise ask Google Assistant to take a screen capture for you. At the point when you’re on the screen, you need to snap, simply state, “Ok Google, take a screen capture,” and it will oblige, saving an image of the screen beneath the Assistant interface. So in case you need to catch the Google Assistant screen itself, you’ll need to utilize the physical buttons on your smartphone.
Save and Share
When you’ve taken your screenshot, you can make a shortcut to it on the notification board. Tap it, and you’ll have the option to share or edit.
In case you need to back up your screen captures to Google Photos, you may need to tell your smartphone to do as such. Open the sidebar in Google Photos; at that point, go to Device Folder. Tap Screenshots, and flip the Backup and sync button. From that point forward, all of your screen captures will be backed-up to your camera roll in Google Photos.
Android Froyo Smartphones and older
In case you happen to have a pre-Gingerbread Android 2.3 smartphone lying around, taking a screen capture is a challenging assignment. Froyo users will require a PC, a USB link, some Android expertise, and third-party software.
Install the Software
Back then, Google figured just engineers would be keen on catching Android screengrabs, so you’ll need to act like one. Download and install the free Android SDK (software development kit). Visit the website and make certain to get the right version for your OS.
The software additionally requires Java. Macintosh OS X has the correct instruments already included. Windows users have to download the Java Development Kit. Install Java and the Android SDK downloads.
Start the SDK Manager from the Android SDK download. (In Windows, whenever asked, pick Extract All.) Accept the terms, and click Install. The SDK will download more bundles and afterward update itself with the most recent version. This procedure can take around 30 minutes, depending on your PC and the internet speed.
Open DDMS (Dalvik Debug Monitor) inside the Android SDK Tools folder. The software will open the console for a minute and afterward dispatch a graphical interface in another window. Give it a minute, yet on the off chance that it stops and there is by all accounts an error at first – as happened to me on my test system – take a stab at running DDMS once more.
On the Android phone, open Setting > Application settings > Development > and select USB debugging. Then connect the Android smartphone to your PC.
In Windows, if the Android doesn’t show up as a posting in the Dalvik Debug Monitor application, go to the Device Manager. Right-click the Android phone and select Update Driver Software. Select the Browse my PC for driver programming option, then click Browse and explore to the USB driver folder inside the Android SDK envelope. Click on Next. Affirm the accompanying brief to Install the driver. Come back to the Dalvik Debug Monitor; your Droid should now be recorded.
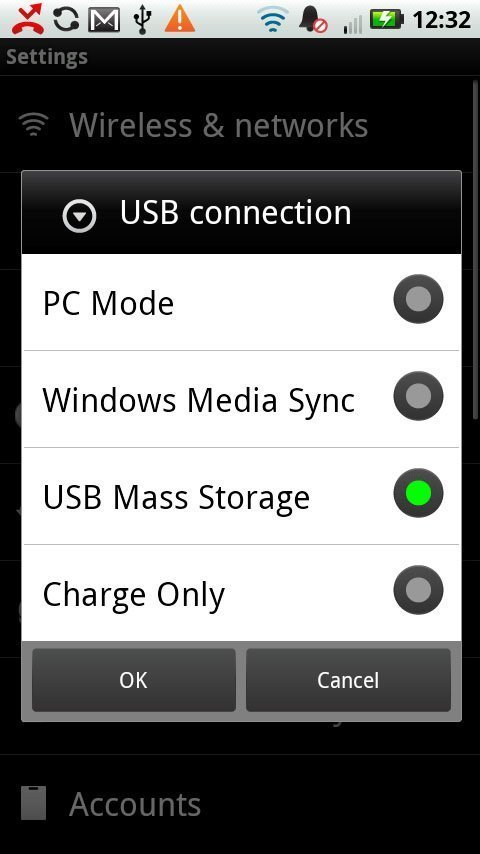
With either OS, if your Android device, despite everything failed to appear in the Dalvik Debug Monitor, check that you set it for USB debugging mode. Likewise, drag the menu down from the top of the Android screen and pick the USB connection. In many examples, you’ll need USB Mass Storage to be chosen. (I needed to perform these steps on a Droid X since it set itself up in PC Mode first.) But attempt PC Mode if the software isn’t finding your Android; that may take care of the issue.
On your PC, click the smartphone symbol in the upper-left segment to choose your Android. On the Android, set up the minute you need to capture. On the PC, pick Device, Screen catch. Click Save. Rehash the procedure for extra screen captures as required.
Get to the Root
In case you’re a smart Android fan, you can shoot screengrabs without attaching to a PC by any means. However, to use this method, you’ll need to root your smartphone.
Generally, the Android OS hinders screen capture applications from working, since they waste around with more permissions. The rooting procedure gives superuser capacities, in any case, allowing you permission to do anything you need.
After rooting, scan the Android Marketplace for Screenshot to discover different applications, for example, Screenshot It and Screenshot. You’ll activate screen captures with a timer, by shaking the phone, or by means of another command, and the application will, at that point, catch your gadget screen.
Simple, isn’t that so?
Learn more: How to take a screenshot on an iPhones