Here’s how to take a screenshot on an iPhone X and new iPhone Models
The quick answer is: Press the Lock and Volume Up button on your phone simultaneously to catch a screen capture. For more clarification on how to take a screen capture on an iPhone X and newer phones utilizing other strategies, read on.
Since Apple jettisoned Touch ID with the iPhone X arrangement in return for Face ID, the way toward taking screen captures is somewhat not quite the same as with past iPhones. In case this is your first iPhone since the change, then it may take a bit of becoming adapted to it, yet you will have it down in the blink of an eye. Since iOS 11, you can do likewise considerably more with Screen captures by stamping them up with a wide range of shading tools and sharing them across the social media universe, instant messages, and email.
Taking Screen captures with Physical Buttons. Stage 1: Locate the right fastens — Since the home button is missing, you will need to find the Lock button and Volume up button on your iPhone X. This will be located at the top button on the left half of the telephone, and the big button situated on the right side. The arrangement may feel remote from the start, yet there isn’t too much of a distinction.
Stage 2: Capture the Screenshot — To take a screengrab, you need to press the two buttons at the same time. The Screen will, at that point, will quick flash, and your Screenshot will show up in the lower lefthand corner. In case your phone isn’t in quiet mode, you will likewise hear a sound when the Screengrab is taken.

Stage 3: Edit the Screenshot — If you don’t expel the Screengrab by swiping to one side, it will vanish, consequently following a couple of moments and saved to the camera roll. Tapping on the Screenshot will likewise pull up alternatives to edit it. There are choices to trim or amplify the picture, and you can likewise check it up with different shading tools.
Stage 4: View and offer the screen capture — If you don’t reject the Screenshot by swiping to one side, it will vanish naturally following a couple of moments and save to your camera roll. Tapping on the Screenshot will likewise pull up alternatives to edit it. There are alternatives to edit or amplify the picture, and you can likewise check it up with a variety of shading tools.
Few coincidental Screen captures — With the arrival of iOS 12 a year ago, Apple released a fix to prevent unintentional Screen captures on the iPhone X. Since the volume up and lock buttons were assigned for Screen captures. A few clients would involuntarily press the two buttons when going after their gadgets. An update from iOS 12 assists with thwarting careless Screen captures, however, just when the display of the phone is off.
Taking Screen captures with AssistiveTouch.
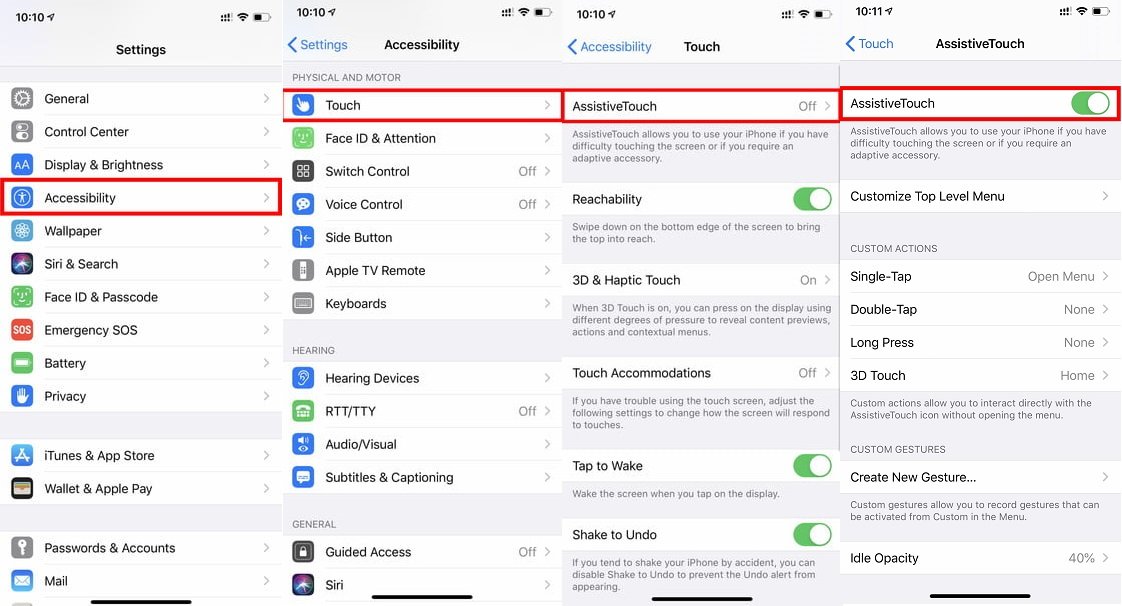
Stage 1: Turn on AssistiveTouch — With AssistiveTouch, you can perform some complex touch-based activities. This incorporates pinching, activating 3D Touch, or multi-finger swiping. To turn it on, move to Settings > Accessibility > Touch > AssistiveTouch and switch AssistiveTouch. On the off chance that you’re utilizing AssistiveTouch for screen captures, at that point, you can utilize the following stages to set it as your only accessible action.
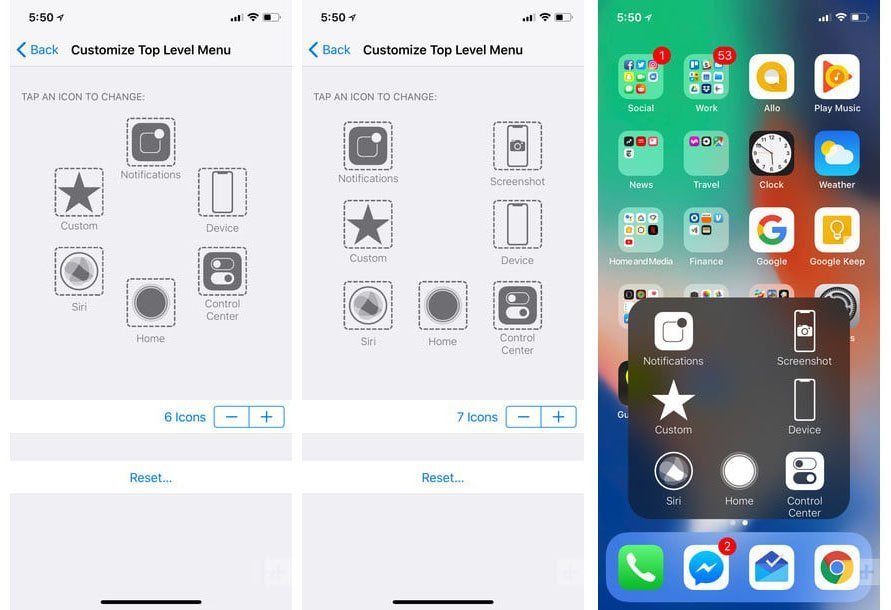
Stage 2: Bring up the AssistiveTouch menu or tap the button— You can decide to have the screen capture activity in the Open Menu alternative — which is the conventional configuration where the menu opens up subsequent to touching the AssistiveTouch button. To tweak the menu, go to Settings > Accessibility > Touch > AssistiveTouch and touch Customize Top Level Menu. There, you can touch an icon to change it or include another by touching the addition sign symbol in the lower right-hand corner. A rundown of various decisions will come up, and you can scroll down to include Screenshot. You would then be able to pick on the off chance that you need the menu to open up through single-tap, two taps, long press, or 3D touch. In case you’re just utilizing AssistiveTouch for screen captures, you can set the action of making a screen capture to any of those custom activities also.
Stage 3: Capture the Screenshot — If you picked the Open Menu format, you need to touch the AssistiveTouch button to open the menu and tap on the Screenshot option. In the event that you decided to just have AssistiveTouch perform screen captures, at that point, you can touch on the button depending upon the custom action you picked. With the two settings, your iPhone display will quickly flash white, which flags the Screengrab worked effectively. You will hear a small sound too if your phone isn’t in quiet mode.
Stage 4: View, alter, and share the Screen capture — With AssistiveTouch, photographs are saved at a similar path as with Screen captures taken utilizing physical buttons. It will consequently save to your Screenshots photograph collection regardless of the chance that you dismiss it by swiping to one side or let it vanish. By tapping on it, you can edit, amplify, or increase the picture, and afterward share it via social media networking websites or instant messages.
Learn more: How to take a screenshot on a Mac