A screenshot is a picture taken of anything that’s on your screen. Today we’re demonstrating how to take a screenshot in Windows.
You can take a screengrab on pretty much any device, and taking screen captures in Windows is the same. It has worked in the option that works extraordinary for basic assignments. However, some third-party projects offer more features and ease of use. Right now, we will show you various approaches to take screenshots in Windows 10.
 Advanced system settings > Click the Advanced tab > Click Settings under Performance area). How To Take a Screenshot Without Saving Press the "PrtScn" key. A screengrab of your display is currently copied to the clipboard. Open a picture editorial manager of your choice, word processor, or another program that you need to utilize your picture. Click Edit > Paste to paste the screen capture any place you like. The dimensions of the picture will be equivalent to your workstation resolution. Note: On certain PC’s and different devices, you may need to press the "PrtScn + Alt + Fn" keys. Check your PC’s manual for more data. How to Take a Screenshot of Only One Window Select the title bar of the window that you need to capture. Press "Alt + PrtScn." A screenshot of your present active window will be replicated to the clipboard, similarly as in the last section. Paste it into your choice of picture editor or record document manager. Note: On certain PCs and different gadgets, you may need to press the "Alt + Fn + PrtScn" keys. Check your PC’s manual for more data. How to Take a Screenshot of Part of Your Screen Press "Windows + Shift + S". Your screen will be turned gray out, and your mouse cursor will change. Click and move your screen to choose the piece on the screen you need to catch. A screengrab of the screen area you chose will be replicated to your clipboard. You can copy it to any application by choosing Edit > Paste or squeezing Ctrl + V, similarly as you’d paste a full-screen option taken with the Print Screen key. This will only work in Windows 10’s Creators Update. On more older forms of Windows, this alternate option is a part of Microsoft’s OneNote application. With the Creators Update, Microsoft coordinated this option into Windows 10 itself. Technique Two: Take More Flexible Screenshots using Snipping Tool The Snipping Tool has been a component of Windows for quite a while. This tool was first introduced in Windows Vista and never got any new highlights other than a couple of bug fixes. The Snipping feature can take screen captures of an open window, a rectangular area, a freestyle area, or the whole screen. You can comment on your cuts with various colored highlighter or pens, save it as a picture or MHTML document, or email it to a co-worker. Clipping Tool in Windows Vista, 7, and 8 has one drawback: it can’t catch screen captures that include mouse movements. To catch something that includes mouse movements, similar to pop-up menus and tooltips, you should utilize the Print Screen technique. In Windows 10, Snipping Tool has another "delay" choice, which will permit you to catch screen captures of pop-up menus and tooltips. Open the Snipping Tool application and click Delay. From the drop list that appears, click on the number of seconds you’d prefer to hold up until your screen capture is taken. Then pick the sort of cut you need to make by tapping the arrow alongside "New." You can look over one of four kinds of cut: rectangular, window, free-form, and full-screen. In contrast to a standard clip, the screen won’t become dull. You will have between 1–5 seconds; depending upon the Delay, you decided to set up your screenshots. You can utilize this time to open that pop-up or tooltip you need to capture. When your time has passed, the screen will freeze and become dim so you can make your cut. In the event that you picked a window or full-screen, it would simply catch the cut right away. Technique Three: Use Keyboard Shortcuts with Game Bar in Windows 10 Windows 10 ships with game DVR capacities to record ongoing gameplay film and take screengrabs of Windows PC games. The Game Bar produces screen captures in PNG format and save them in "C:\Users\[your username]\Videos\Captures." Before you begin utilizing the Game Bar, open the Xbox application that accompanied Windows 10 to check its settings. Under "Game DVR," switch "Take screenshots using Game DVR," and assign whatever alternate keyboard buttons you need. At the point when you need to take a screengrab, utilize that keyboard mix ("Windows key + G" as default choice) and tap or click on the "Yes, this is a game" box whenever it popo-up. Then press the "Camera symbol" or "Win + Alt + PrtScn" to take a screenshot. Note: The alternate keyboard keys will possibly work on the off chance that you have recently clicked the "Yes, this is a game" option for this particular game. You will see a warning saying, "Screenshot saved." If you tap or click on the notice, it will open to "Xbox > Game DVR > On this PC" to see it. Technique Four: Take More Powerful Screenshots the Easy Way with Snagit The entirety of Windows’ built-in approaches have their own upsides and downsides. In the event that you take a lot of screenshots and need more versatility than what the built-in applications offer, a third-party application is your best alternative. If you have no problem putting in a couple of dollars, Snagit by Techsmith is a first-rate application that makes taking screengrab simple. Snagit has huge amounts of features that let you target explicit windows, take specific area snapshots, and even catch the full content of scrolling windows like web pages. You can take short recordings on the off chance that you need, comment on screen captures, draw arrows and shapes, and basically anything you can envision a screen capture application ought to have the option to do. It’s an extraordinary tool that we certainly suggest, particularly on the off chance that you have to take plenty of screenshots. There’s a free trial option that you can download to look at it before trying to burn through some cash on it. When you attempt it, it’ll be not very easy to return to Windows’ basic tools.” width=”635″ height=”313″>
Technique One: Use Print Screen (PrtScn) to take Quick Screenshots with
The Print Screen button present your keyboard can take a screen capture and save it as a document, take a screen capture without saving it as a document, or take a screen capture of just one window (rather than the full screen). The print screen button might be marked as “PrtScn,” “PrntScrn,” “Print Scr,” or something comparative. On most keyboards, the catch is typically found among F12 and Scroll Lock. On PC keyboards, you may need to press the “function” or “Fn” key to get to the Print Screen option. At the instance, when you press the key, it will appear as though nothing occurred, yet the screen capture has been saved to your clipboard.
How to Save Your Screenshot as a File
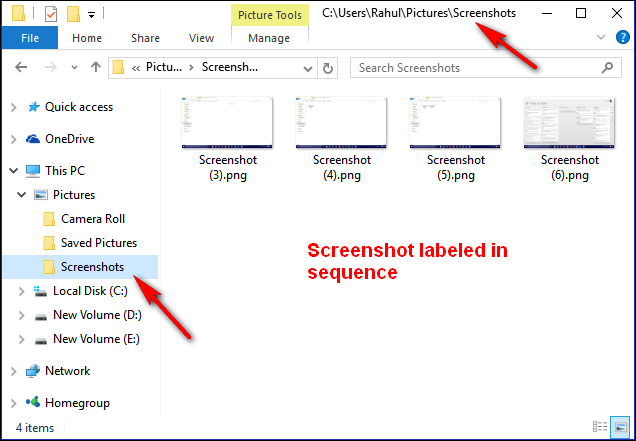
Press the ” PrtScn + Windows logo key.” If you are utilizing a tablet, press the “Windows logo button + volume down button.” On certain PC’s and different devices, you may need to press the “Ctrl + PrtScn +Windows logo key ” or “Fn + PrtScn + Windows logo key” keys. Check your PC’s manual for more data.
The screen will dim for a small amount of time, and you will see the screen capture appear as a document in an envelope entitled “Screenshots,” inside your default “Pictures” organizer. The screen capture is naturally marked with a number.
 Advanced system settings > Click the Advanced tab > Click Settings under Performance area). How To Take a Screenshot Without Saving Press the "PrtScn" key. A screengrab of your display is currently copied to the clipboard. Open a picture editorial manager of your choice, word processor, or another program that you need to utilize your picture. Click Edit > Paste to paste the screen capture any place you like. The dimensions of the picture will be equivalent to your workstation resolution. Note: On certain PC’s and different devices, you may need to press the "PrtScn + Alt + Fn" keys. Check your PC’s manual for more data. How to Take a Screenshot of Only One Window Select the title bar of the window that you need to capture. Press "Alt + PrtScn." A screenshot of your present active window will be replicated to the clipboard, similarly as in the last section. Paste it into your choice of picture editor or record document manager. Note: On certain PCs and different gadgets, you may need to press the "Alt + Fn + PrtScn" keys. Check your PC’s manual for more data. How to Take a Screenshot of Part of Your Screen Press "Windows + Shift + S". Your screen will be turned gray out, and your mouse cursor will change. Click and move your screen to choose the piece on the screen you need to catch. A screengrab of the screen area you chose will be replicated to your clipboard. You can copy it to any application by choosing Edit > Paste or squeezing Ctrl + V, similarly as you’d paste a full-screen option taken with the Print Screen key. This will only work in Windows 10’s Creators Update. On more older forms of Windows, this alternate option is a part of Microsoft’s OneNote application. With the Creators Update, Microsoft coordinated this option into Windows 10 itself. Technique Two: Take More Flexible Screenshots using Snipping Tool The Snipping Tool has been a component of Windows for quite a while. This tool was first introduced in Windows Vista and never got any new highlights other than a couple of bug fixes. The Snipping feature can take screen captures of an open window, a rectangular area, a freestyle area, or the whole screen. You can comment on your cuts with various colored highlighter or pens, save it as a picture or MHTML document, or email it to a co-worker. Clipping Tool in Windows Vista, 7, and 8 has one drawback: it can’t catch screen captures that include mouse movements. To catch something that includes mouse movements, similar to pop-up menus and tooltips, you should utilize the Print Screen technique. In Windows 10, Snipping Tool has another "delay" choice, which will permit you to catch screen captures of pop-up menus and tooltips. Open the Snipping Tool application and click Delay. From the drop list that appears, click on the number of seconds you’d prefer to hold up until your screen capture is taken. Then pick the sort of cut you need to make by tapping the arrow alongside "New." You can look over one of four kinds of cut: rectangular, window, free-form, and full-screen. In contrast to a standard clip, the screen won’t become dull. You will have between 1–5 seconds; depending upon the Delay, you decided to set up your screenshots. You can utilize this time to open that pop-up or tooltip you need to capture. When your time has passed, the screen will freeze and become dim so you can make your cut. In the event that you picked a window or full-screen, it would simply catch the cut right away. Technique Three: Use Keyboard Shortcuts with Game Bar in Windows 10 Windows 10 ships with game DVR capacities to record ongoing gameplay film and take screengrabs of Windows PC games. The Game Bar produces screen captures in PNG format and save them in "C:\Users\[your username]\Videos\Captures." Before you begin utilizing the Game Bar, open the Xbox application that accompanied Windows 10 to check its settings. Under "Game DVR," switch "Take screenshots using Game DVR," and assign whatever alternate keyboard buttons you need. At the point when you need to take a screengrab, utilize that keyboard mix ("Windows key + G" as default choice) and tap or click on the "Yes, this is a game" box whenever it popo-up. Then press the "Camera symbol" or "Win + Alt + PrtScn" to take a screenshot. Note: The alternate keyboard keys will possibly work on the off chance that you have recently clicked the "Yes, this is a game" option for this particular game. You will see a warning saying, "Screenshot saved." If you tap or click on the notice, it will open to "Xbox > Game DVR > On this PC" to see it. Technique Four: Take More Powerful Screenshots the Easy Way with Snagit The entirety of Windows’ built-in approaches have their own upsides and downsides. In the event that you take a lot of screenshots and need more versatility than what the built-in applications offer, a third-party application is your best alternative. If you have no problem putting in a couple of dollars, Snagit by Techsmith is a first-rate application that makes taking screengrab simple. Snagit has huge amounts of features that let you target explicit windows, take specific area snapshots, and even catch the full content of scrolling windows like web pages. You can take short recordings on the off chance that you need, comment on screen captures, draw arrows and shapes, and basically anything you can envision a screen capture application ought to have the option to do. It’s an extraordinary tool that we certainly suggest, particularly on the off chance that you have to take plenty of screenshots. There’s a free trial option that you can download to look at it before trying to burn through some cash on it. When you attempt it, it’ll be not very easy to return to Windows’ basic tools.” width=”636″ height=”441″>
You will possibly observe your screen dim in the event that you have the “Animate windows while minimizing and maximizing” turned on in your enhanced visualizations settings (System > Advanced system settings > Click the Advanced tab > Click Settings under Performance area).
How To Take a Screenshot Without Saving
Press the “PrtScn” key. A screengrab of your display is currently copied to the clipboard. Open a picture editorial manager of your choice, word processor, or another program that you need to utilize your picture. Click Edit > Paste to paste the screen capture any place you like. The dimensions of the picture will be equivalent to your workstation resolution. Note: On certain PC’s and different devices, you may need to press the “PrtScn + Alt + Fn” keys. Check your PC’s manual for more data.
How to Take a Screenshot of Only One Window
Select the title bar of the window that you need to capture. Press “Alt + PrtScn.” A screenshot of your present active window will be replicated to the clipboard, similarly as in the last section. Paste it into your choice of picture editor or record document manager. Note: On certain PCs and different gadgets, you may need to press the “Alt + Fn + PrtScn” keys. Check your PC’s manual for more data.
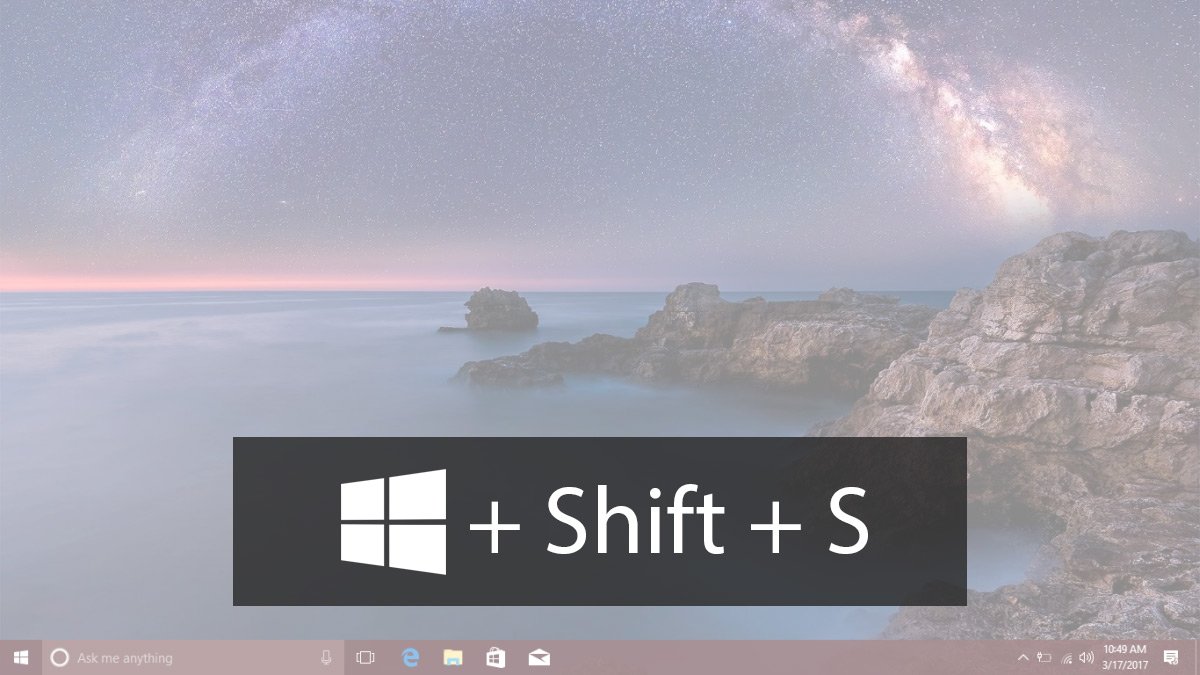
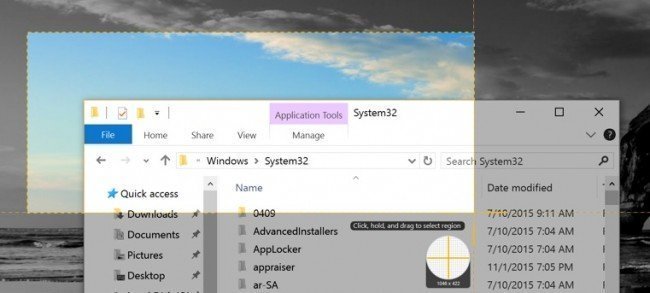
How to Take a Screenshot of Part of Your Screen
Press “Windows + Shift + S”. Your screen will be turned gray out, and your mouse cursor will change. Click and move your screen to choose the piece on the screen you need to catch. A screengrab of the screen area you chose will be replicated to your clipboard. You can copy it to any application by choosing Edit > Paste or squeezing Ctrl + V, similarly as you’d paste a full-screen option taken with the Print Screen key.
This will only work in Windows 10’s Creators Update. On more older forms of Windows, this alternate option is a part of Microsoft’s OneNote application. With the Creators Update, Microsoft coordinated this option into Windows 10 itself.
 Advanced system settings > Click the Advanced tab > Click Settings under Performance area). How To Take a Screenshot Without Saving Press the "PrtScn" key. A screengrab of your display is currently copied to the clipboard. Open a picture editorial manager of your choice, word processor, or another program that you need to utilize your picture. Click Edit > Paste to paste the screen capture any place you like. The dimensions of the picture will be equivalent to your workstation resolution. Note: On certain PC’s and different devices, you may need to press the "PrtScn + Alt + Fn" keys. Check your PC’s manual for more data. How to Take a Screenshot of Only One Window Select the title bar of the window that you need to capture. Press "Alt + PrtScn." A screenshot of your present active window will be replicated to the clipboard, similarly as in the last section. Paste it into your choice of picture editor or record document manager. Note: On certain PCs and different gadgets, you may need to press the "Alt + Fn + PrtScn" keys. Check your PC’s manual for more data. How to Take a Screenshot of Part of Your Screen Press "Windows + Shift + S". Your screen will be turned gray out, and your mouse cursor will change. Click and move your screen to choose the piece on the screen you need to catch. A screengrab of the screen area you chose will be replicated to your clipboard. You can copy it to any application by choosing Edit > Paste or squeezing Ctrl + V, similarly as you’d paste a full-screen option taken with the Print Screen key. This will only work in Windows 10’s Creators Update. On more older forms of Windows, this alternate option is a part of Microsoft’s OneNote application. With the Creators Update, Microsoft coordinated this option into Windows 10 itself. Technique Two: Take More Flexible Screenshots using Snipping Tool The Snipping Tool has been a component of Windows for quite a while. This tool was first introduced in Windows Vista and never got any new highlights other than a couple of bug fixes. The Snipping feature can take screen captures of an open window, a rectangular area, a freestyle area, or the whole screen. You can comment on your cuts with various colored highlighter or pens, save it as a picture or MHTML document, or email it to a co-worker. Clipping Tool in Windows Vista, 7, and 8 has one drawback: it can’t catch screen captures that include mouse movements. To catch something that includes mouse movements, similar to pop-up menus and tooltips, you should utilize the Print Screen technique. In Windows 10, Snipping Tool has another "delay" choice, which will permit you to catch screen captures of pop-up menus and tooltips. Open the Snipping Tool application and click Delay. From the drop list that appears, click on the number of seconds you’d prefer to hold up until your screen capture is taken. Then pick the sort of cut you need to make by tapping the arrow alongside "New." You can look over one of four kinds of cut: rectangular, window, free-form, and full-screen. In contrast to a standard clip, the screen won’t become dull. You will have between 1–5 seconds; depending upon the Delay, you decided to set up your screenshots. You can utilize this time to open that pop-up or tooltip you need to capture. When your time has passed, the screen will freeze and become dim so you can make your cut. In the event that you picked a window or full-screen, it would simply catch the cut right away. Technique Three: Use Keyboard Shortcuts with Game Bar in Windows 10 Windows 10 ships with game DVR capacities to record ongoing gameplay film and take screengrabs of Windows PC games. The Game Bar produces screen captures in PNG format and save them in "C:\Users\[your username]\Videos\Captures." Before you begin utilizing the Game Bar, open the Xbox application that accompanied Windows 10 to check its settings. Under "Game DVR," switch "Take screenshots using Game DVR," and assign whatever alternate keyboard buttons you need. At the point when you need to take a screengrab, utilize that keyboard mix ("Windows key + G" as default choice) and tap or click on the "Yes, this is a game" box whenever it popo-up. Then press the "Camera symbol" or "Win + Alt + PrtScn" to take a screenshot. Note: The alternate keyboard keys will possibly work on the off chance that you have recently clicked the "Yes, this is a game" option for this particular game. You will see a warning saying, "Screenshot saved." If you tap or click on the notice, it will open to "Xbox > Game DVR > On this PC" to see it. Technique Four: Take More Powerful Screenshots the Easy Way with Snagit The entirety of Windows’ built-in approaches have their own upsides and downsides. In the event that you take a lot of screenshots and need more versatility than what the built-in applications offer, a third-party application is your best alternative. If you have no problem putting in a couple of dollars, Snagit by Techsmith is a first-rate application that makes taking screengrab simple. Snagit has huge amounts of features that let you target explicit windows, take specific area snapshots, and even catch the full content of scrolling windows like web pages. You can take short recordings on the off chance that you need, comment on screen captures, draw arrows and shapes, and basically anything you can envision a screen capture application ought to have the option to do. It’s an extraordinary tool that we certainly suggest, particularly on the off chance that you have to take plenty of screenshots. There’s a free trial option that you can download to look at it before trying to burn through some cash on it. When you attempt it, it’ll be not very easy to return to Windows’ basic tools.” width=”1200″ height=”675″>
Technique Two: Take More Flexible Screenshots using Snipping Tool
The Snipping Tool has been a component of Windows for quite a while. This tool was first introduced in Windows Vista and never got any new highlights other than a couple of bug fixes. The Snipping feature can take screen captures of an open window, a rectangular area, a freestyle area, or the whole screen. You can comment on your cuts with various colored highlighter or pens, save it as a picture or MHTML document, or email it to a co-worker.
Clipping Tool in Windows Vista, 7, and 8 has one drawback: it can’t catch screen captures that include mouse movements. To catch something that includes mouse movements, similar to pop-up menus and tooltips, you should utilize the Print Screen technique.
In Windows 10, Snipping Tool has another “delay” choice, which will permit you to catch screen captures of pop-up menus and tooltips. Open the Snipping Tool application and click Delay. From the drop list that appears, click on the number of seconds you’d prefer to hold up until your screen capture is taken.
 Advanced system settings > Click the Advanced tab > Click Settings under Performance area). How To Take a Screenshot Without Saving Press the "PrtScn" key. A screengrab of your display is currently copied to the clipboard. Open a picture editorial manager of your choice, word processor, or another program that you need to utilize your picture. Click Edit > Paste to paste the screen capture any place you like. The dimensions of the picture will be equivalent to your workstation resolution. Note: On certain PC’s and different devices, you may need to press the "PrtScn + Alt + Fn" keys. Check your PC’s manual for more data. How to Take a Screenshot of Only One Window Select the title bar of the window that you need to capture. Press "Alt + PrtScn." A screenshot of your present active window will be replicated to the clipboard, similarly as in the last section. Paste it into your choice of picture editor or record document manager. Note: On certain PCs and different gadgets, you may need to press the "Alt + Fn + PrtScn" keys. Check your PC’s manual for more data. How to Take a Screenshot of Part of Your Screen Press "Windows + Shift + S". Your screen will be turned gray out, and your mouse cursor will change. Click and move your screen to choose the piece on the screen you need to catch. A screengrab of the screen area you chose will be replicated to your clipboard. You can copy it to any application by choosing Edit > Paste or squeezing Ctrl + V, similarly as you’d paste a full-screen option taken with the Print Screen key. This will only work in Windows 10’s Creators Update. On more older forms of Windows, this alternate option is a part of Microsoft’s OneNote application. With the Creators Update, Microsoft coordinated this option into Windows 10 itself. Technique Two: Take More Flexible Screenshots using Snipping Tool The Snipping Tool has been a component of Windows for quite a while. This tool was first introduced in Windows Vista and never got any new highlights other than a couple of bug fixes. The Snipping feature can take screen captures of an open window, a rectangular area, a freestyle area, or the whole screen. You can comment on your cuts with various colored highlighter or pens, save it as a picture or MHTML document, or email it to a co-worker. Clipping Tool in Windows Vista, 7, and 8 has one drawback: it can’t catch screen captures that include mouse movements. To catch something that includes mouse movements, similar to pop-up menus and tooltips, you should utilize the Print Screen technique. In Windows 10, Snipping Tool has another "delay" choice, which will permit you to catch screen captures of pop-up menus and tooltips. Open the Snipping Tool application and click Delay. From the drop list that appears, click on the number of seconds you’d prefer to hold up until your screen capture is taken. Then pick the sort of cut you need to make by tapping the arrow alongside "New." You can look over one of four kinds of cut: rectangular, window, free-form, and full-screen. In contrast to a standard clip, the screen won’t become dull. You will have between 1–5 seconds; depending upon the Delay, you decided to set up your screenshots. You can utilize this time to open that pop-up or tooltip you need to capture. When your time has passed, the screen will freeze and become dim so you can make your cut. In the event that you picked a window or full-screen, it would simply catch the cut right away. Technique Three: Use Keyboard Shortcuts with Game Bar in Windows 10 Windows 10 ships with game DVR capacities to record ongoing gameplay film and take screengrabs of Windows PC games. The Game Bar produces screen captures in PNG format and save them in "C:\Users\[your username]\Videos\Captures." Before you begin utilizing the Game Bar, open the Xbox application that accompanied Windows 10 to check its settings. Under "Game DVR," switch "Take screenshots using Game DVR," and assign whatever alternate keyboard buttons you need. At the point when you need to take a screengrab, utilize that keyboard mix ("Windows key + G" as default choice) and tap or click on the "Yes, this is a game" box whenever it popo-up. Then press the "Camera symbol" or "Win + Alt + PrtScn" to take a screenshot. Note: The alternate keyboard keys will possibly work on the off chance that you have recently clicked the "Yes, this is a game" option for this particular game. You will see a warning saying, "Screenshot saved." If you tap or click on the notice, it will open to "Xbox > Game DVR > On this PC" to see it. Technique Four: Take More Powerful Screenshots the Easy Way with Snagit The entirety of Windows’ built-in approaches have their own upsides and downsides. In the event that you take a lot of screenshots and need more versatility than what the built-in applications offer, a third-party application is your best alternative. If you have no problem putting in a couple of dollars, Snagit by Techsmith is a first-rate application that makes taking screengrab simple. Snagit has huge amounts of features that let you target explicit windows, take specific area snapshots, and even catch the full content of scrolling windows like web pages. You can take short recordings on the off chance that you need, comment on screen captures, draw arrows and shapes, and basically anything you can envision a screen capture application ought to have the option to do. It’s an extraordinary tool that we certainly suggest, particularly on the off chance that you have to take plenty of screenshots. There’s a free trial option that you can download to look at it before trying to burn through some cash on it. When you attempt it, it’ll be not very easy to return to Windows’ basic tools.” width=”353″ height=”242″>
Then pick the sort of cut you need to make by tapping the arrow alongside “New.” You can look over one of four kinds of cut: rectangular, window, free-form, and full-screen.
 Advanced system settings > Click the Advanced tab > Click Settings under Performance area). How To Take a Screenshot Without Saving Press the "PrtScn" key. A screengrab of your display is currently copied to the clipboard. Open a picture editorial manager of your choice, word processor, or another program that you need to utilize your picture. Click Edit > Paste to paste the screen capture any place you like. The dimensions of the picture will be equivalent to your workstation resolution. Note: On certain PC’s and different devices, you may need to press the "PrtScn + Alt + Fn" keys. Check your PC’s manual for more data. How to Take a Screenshot of Only One Window Select the title bar of the window that you need to capture. Press "Alt + PrtScn." A screenshot of your present active window will be replicated to the clipboard, similarly as in the last section. Paste it into your choice of picture editor or record document manager. Note: On certain PCs and different gadgets, you may need to press the "Alt + Fn + PrtScn" keys. Check your PC’s manual for more data. How to Take a Screenshot of Part of Your Screen Press "Windows + Shift + S". Your screen will be turned gray out, and your mouse cursor will change. Click and move your screen to choose the piece on the screen you need to catch. A screengrab of the screen area you chose will be replicated to your clipboard. You can copy it to any application by choosing Edit > Paste or squeezing Ctrl + V, similarly as you’d paste a full-screen option taken with the Print Screen key. This will only work in Windows 10’s Creators Update. On more older forms of Windows, this alternate option is a part of Microsoft’s OneNote application. With the Creators Update, Microsoft coordinated this option into Windows 10 itself. Technique Two: Take More Flexible Screenshots using Snipping Tool The Snipping Tool has been a component of Windows for quite a while. This tool was first introduced in Windows Vista and never got any new highlights other than a couple of bug fixes. The Snipping feature can take screen captures of an open window, a rectangular area, a freestyle area, or the whole screen. You can comment on your cuts with various colored highlighter or pens, save it as a picture or MHTML document, or email it to a co-worker. Clipping Tool in Windows Vista, 7, and 8 has one drawback: it can’t catch screen captures that include mouse movements. To catch something that includes mouse movements, similar to pop-up menus and tooltips, you should utilize the Print Screen technique. In Windows 10, Snipping Tool has another "delay" choice, which will permit you to catch screen captures of pop-up menus and tooltips. Open the Snipping Tool application and click Delay. From the drop list that appears, click on the number of seconds you’d prefer to hold up until your screen capture is taken. Then pick the sort of cut you need to make by tapping the arrow alongside "New." You can look over one of four kinds of cut: rectangular, window, free-form, and full-screen. In contrast to a standard clip, the screen won’t become dull. You will have between 1–5 seconds; depending upon the Delay, you decided to set up your screenshots. You can utilize this time to open that pop-up or tooltip you need to capture. When your time has passed, the screen will freeze and become dim so you can make your cut. In the event that you picked a window or full-screen, it would simply catch the cut right away. Technique Three: Use Keyboard Shortcuts with Game Bar in Windows 10 Windows 10 ships with game DVR capacities to record ongoing gameplay film and take screengrabs of Windows PC games. The Game Bar produces screen captures in PNG format and save them in "C:\Users\[your username]\Videos\Captures." Before you begin utilizing the Game Bar, open the Xbox application that accompanied Windows 10 to check its settings. Under "Game DVR," switch "Take screenshots using Game DVR," and assign whatever alternate keyboard buttons you need. At the point when you need to take a screengrab, utilize that keyboard mix ("Windows key + G" as default choice) and tap or click on the "Yes, this is a game" box whenever it popo-up. Then press the "Camera symbol" or "Win + Alt + PrtScn" to take a screenshot. Note: The alternate keyboard keys will possibly work on the off chance that you have recently clicked the "Yes, this is a game" option for this particular game. You will see a warning saying, "Screenshot saved." If you tap or click on the notice, it will open to "Xbox > Game DVR > On this PC" to see it. Technique Four: Take More Powerful Screenshots the Easy Way with Snagit The entirety of Windows’ built-in approaches have their own upsides and downsides. In the event that you take a lot of screenshots and need more versatility than what the built-in applications offer, a third-party application is your best alternative. If you have no problem putting in a couple of dollars, Snagit by Techsmith is a first-rate application that makes taking screengrab simple. Snagit has huge amounts of features that let you target explicit windows, take specific area snapshots, and even catch the full content of scrolling windows like web pages. You can take short recordings on the off chance that you need, comment on screen captures, draw arrows and shapes, and basically anything you can envision a screen capture application ought to have the option to do. It’s an extraordinary tool that we certainly suggest, particularly on the off chance that you have to take plenty of screenshots. There’s a free trial option that you can download to look at it before trying to burn through some cash on it. When you attempt it, it’ll be not very easy to return to Windows’ basic tools.” width=”379″ height=”229″>
In contrast to a standard clip, the screen won’t become dull. You will have between 1–5 seconds; depending upon the Delay, you decided to set up your screenshots. You can utilize this time to open that pop-up or tooltip you need to capture. When your time has passed, the screen will freeze and become dim so you can make your cut. In the event that you picked a window or full-screen, it would simply catch the cut right away.
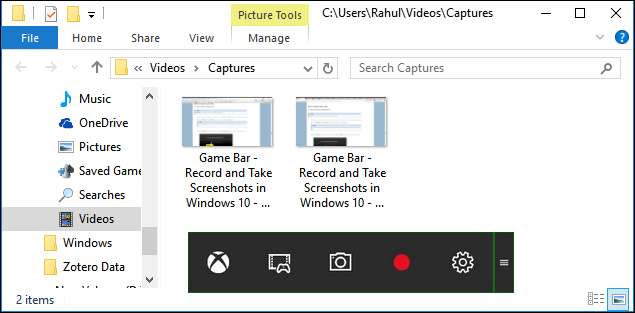
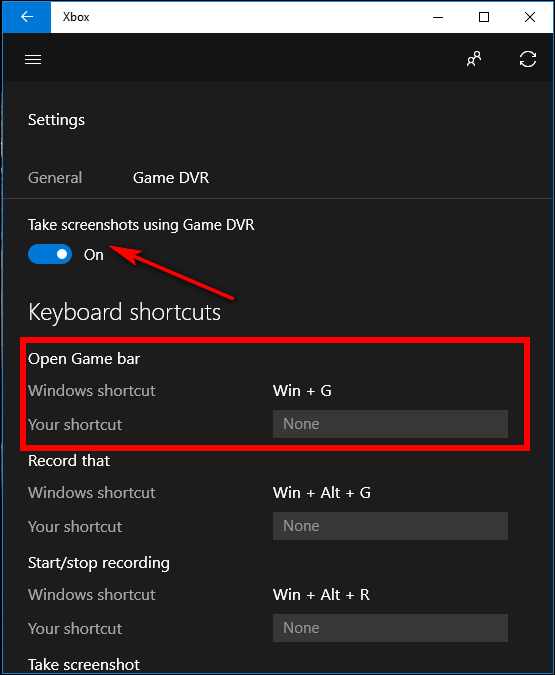
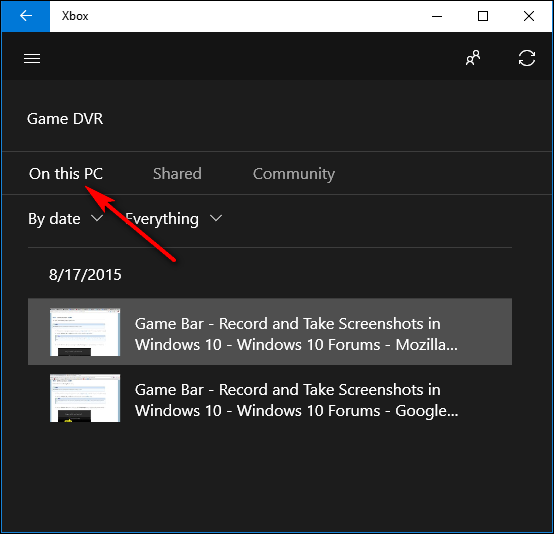
Technique Three: Use Keyboard Shortcuts with Game Bar in Windows 10
Windows 10 ships with game DVR capacities to record ongoing gameplay film and take screengrabs of Windows PC games. The Game Bar produces screen captures in PNG format and save them in “C:\Users\[your username]\Videos\Captures.” Before you begin utilizing the Game Bar, open the Xbox application that accompanied Windows 10 to check its settings. Under “Game DVR,” switch “Take screenshots using Game DVR,” and assign whatever alternate keyboard buttons you need.
 Advanced system settings > Click the Advanced tab > Click Settings under Performance area). How To Take a Screenshot Without Saving Press the "PrtScn" key. A screengrab of your display is currently copied to the clipboard. Open a picture editorial manager of your choice, word processor, or another program that you need to utilize your picture. Click Edit > Paste to paste the screen capture any place you like. The dimensions of the picture will be equivalent to your workstation resolution. Note: On certain PC’s and different devices, you may need to press the "PrtScn + Alt + Fn" keys. Check your PC’s manual for more data. How to Take a Screenshot of Only One Window Select the title bar of the window that you need to capture. Press "Alt + PrtScn." A screenshot of your present active window will be replicated to the clipboard, similarly as in the last section. Paste it into your choice of picture editor or record document manager. Note: On certain PCs and different gadgets, you may need to press the "Alt + Fn + PrtScn" keys. Check your PC’s manual for more data. How to Take a Screenshot of Part of Your Screen Press "Windows + Shift + S". Your screen will be turned gray out, and your mouse cursor will change. Click and move your screen to choose the piece on the screen you need to catch. A screengrab of the screen area you chose will be replicated to your clipboard. You can copy it to any application by choosing Edit > Paste or squeezing Ctrl + V, similarly as you’d paste a full-screen option taken with the Print Screen key. This will only work in Windows 10’s Creators Update. On more older forms of Windows, this alternate option is a part of Microsoft’s OneNote application. With the Creators Update, Microsoft coordinated this option into Windows 10 itself. Technique Two: Take More Flexible Screenshots using Snipping Tool The Snipping Tool has been a component of Windows for quite a while. This tool was first introduced in Windows Vista and never got any new highlights other than a couple of bug fixes. The Snipping feature can take screen captures of an open window, a rectangular area, a freestyle area, or the whole screen. You can comment on your cuts with various colored highlighter or pens, save it as a picture or MHTML document, or email it to a co-worker. Clipping Tool in Windows Vista, 7, and 8 has one drawback: it can’t catch screen captures that include mouse movements. To catch something that includes mouse movements, similar to pop-up menus and tooltips, you should utilize the Print Screen technique. In Windows 10, Snipping Tool has another "delay" choice, which will permit you to catch screen captures of pop-up menus and tooltips. Open the Snipping Tool application and click Delay. From the drop list that appears, click on the number of seconds you’d prefer to hold up until your screen capture is taken. Then pick the sort of cut you need to make by tapping the arrow alongside "New." You can look over one of four kinds of cut: rectangular, window, free-form, and full-screen. In contrast to a standard clip, the screen won’t become dull. You will have between 1–5 seconds; depending upon the Delay, you decided to set up your screenshots. You can utilize this time to open that pop-up or tooltip you need to capture. When your time has passed, the screen will freeze and become dim so you can make your cut. In the event that you picked a window or full-screen, it would simply catch the cut right away. Technique Three: Use Keyboard Shortcuts with Game Bar in Windows 10 Windows 10 ships with game DVR capacities to record ongoing gameplay film and take screengrabs of Windows PC games. The Game Bar produces screen captures in PNG format and save them in "C:\Users\[your username]\Videos\Captures." Before you begin utilizing the Game Bar, open the Xbox application that accompanied Windows 10 to check its settings. Under "Game DVR," switch "Take screenshots using Game DVR," and assign whatever alternate keyboard buttons you need. At the point when you need to take a screengrab, utilize that keyboard mix ("Windows key + G" as default choice) and tap or click on the "Yes, this is a game" box whenever it popo-up. Then press the "Camera symbol" or "Win + Alt + PrtScn" to take a screenshot. Note: The alternate keyboard keys will possibly work on the off chance that you have recently clicked the "Yes, this is a game" option for this particular game. You will see a warning saying, "Screenshot saved." If you tap or click on the notice, it will open to "Xbox > Game DVR > On this PC" to see it. Technique Four: Take More Powerful Screenshots the Easy Way with Snagit The entirety of Windows’ built-in approaches have their own upsides and downsides. In the event that you take a lot of screenshots and need more versatility than what the built-in applications offer, a third-party application is your best alternative. If you have no problem putting in a couple of dollars, Snagit by Techsmith is a first-rate application that makes taking screengrab simple. Snagit has huge amounts of features that let you target explicit windows, take specific area snapshots, and even catch the full content of scrolling windows like web pages. You can take short recordings on the off chance that you need, comment on screen captures, draw arrows and shapes, and basically anything you can envision a screen capture application ought to have the option to do. It’s an extraordinary tool that we certainly suggest, particularly on the off chance that you have to take plenty of screenshots. There’s a free trial option that you can download to look at it before trying to burn through some cash on it. When you attempt it, it’ll be not very easy to return to Windows’ basic tools.” width=”555″ height=”675″>
At the point when you need to take a screengrab, utilize that keyboard mix (“Windows key + G” as default choice) and tap or click on the “Yes, this is a game” box whenever it popo-up. Then press the “Camera symbol” or “Win + Alt + PrtScn” to take a screenshot. Note: The alternate keyboard keys will possibly work on the off chance that you have recently clicked the “Yes, this is a game” option for this particular game. You will see a warning saying, “Screenshot saved.” If you tap or click on the notice, it will open to “Xbox > Game DVR > On this PC” to see it.
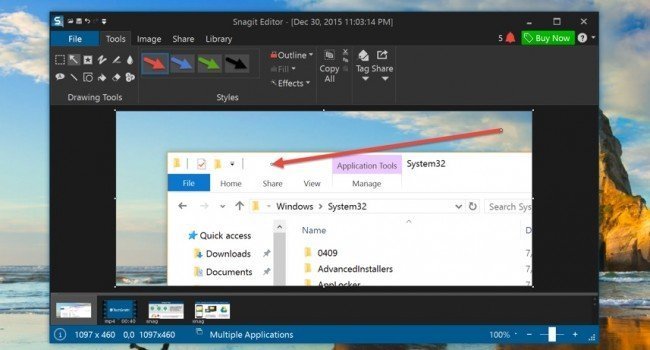
Technique Four: Take More Powerful Screenshots the Easy Way with Snagit
The entirety of Windows’ built-in approaches has its own upsides and downsides. In the event that you take a lot of screenshots and need more versatility than what the built-in applications offer, a third-party application is your best alternative.
If you have no problem putting in a couple of dollars, Snagit by Techsmith is a first-rate application that makes taking screengrab simple. Snagit has huge amounts of features that let you target explicit windows, take specific area snapshots, and even catch the full content of scrolling windows like web pages.
You can take short recordings on the off chance that you need, comment on screen captures, draw arrows and shapes, and basically anything you can envision a screen capture application ought to have the option to do. It’s an extraordinary tool that we certainly suggest, particularly on the off chance that you have to take plenty of screenshots.
There’s a free trial option that you can download to look at it before trying to burn through some cash on it. When you attempt it, it’ll be not very easy to return to Windows’ basic tools.
How to take a screenshot on a Mac
How to take a screenshot on a Mac
On the off chance that you’re beginning from a Windows PC to a Mac, you might be thinking about how to take a screenshot without that Print Screen key for your comfort…
Read more
Learn more: How to take a Screenshots on any Android Phone